Displaying Post Thumbnails in your wordpress theme has become a common habit for many theme developers, until now people used to use many different hacks and approaches to include the Post Thumbnails functionality. The built-in Post Thumbnails functionality for WordPress was unavailable to users until version 2.9 came out which bought alot of great changes along with many improvements. We will be going through the process of learning how to use the WordPress Post Thumbnails in our own themes.
Enabling Support for the Post Thumbnails Feature TOP ↑
First you have to check if your theme supports the post thumbnails feature in your themes functions.php. If not, you can add support for it by defining the following in your functions.php file:
// This theme uses post thumbnails add_theme_support( 'post-thumbnails' );
If you are not building a custom theme just for yourself and might offer it to the public, it would be a good idea to wrap the code like below for better compatibility with older versions of wordpress that does not support this feature, I have it defined as above because i know i have no intentions of downgrading my wordpress. But for the sake of these examples i am going to put them inside those if/else wrappers for you.
if( function_exists( 'add_theme_support' ) ) { // This theme uses post thumbnails add_theme_support( 'post-thumbnails' ); }
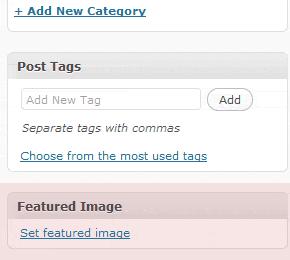
 After completing this step you will now be able to see the the Set Featured Image Link in your
 WP-Admin-> Post-> Add New Post and / or Edit Post section somewhere under the bottom-right Post Tags meta-box, if you don’t see this that means something went wrong, you should try repeating the above process again. You don’t have to upload any images yet, as we haven’t defined any custom sizes for our thumbnails yet.
Setting up your new Post Thumbnail TOP ↑
When you are done with the above, we can start using the two wordpress functions that i have been talking about in my previous post, as i explained in that post – these two functions are the same so its up-to you to decide which one you need and Yes you can use both of them at the same time too. I would recommend just sticking with the set_post_thumbnail_size() function unless you need more than one custom thumbnails, that is where the other function add_image_size() function would be very helpful. Let me first show you how to use the set_post_thumbnail_size() function first. Just like above we will be wrapping this code, like below:
if( function_exists( 'add_theme_support' ) ) { // This theme uses post thumbnails add_theme_support( 'post-thumbnails' ); // Set a default post thumbnail WITH proportional / box resizing set_post_thumbnail_size( 200, 200 ); }
There you have it. You can now upload your new thumbnail from the WordPress Post Interface to see the results. But before we go any further lets go over whats happening in the above code. We are using set_post_thumbnail_size to make a custom thumbnail size, which is named post-thumbnail by default. It is assigned the size that we have defined; In our case it is 200px width with 200px height.
The set_post_thumbnail_size() function assigns this new image size that we generated above a default name / keyword, which is post-thumbnail. We can use it to display that thumbnail in our theme (shown later below).
// Set a default post thumbnail WITH hard cropping mode set_post_thumbnail_size( 150, 150, true );
You can use the hard crop mode, by just specifying that last boolean true parameter, default value for that last crop parameter is false. The last parameter in the above function is to define if you want to crop the image or resize it, setting it to true enables cropping. By default wordpress does proportional / box resizing, it will automatically adjust the image proportionally for you the best way it sees fit so you don’t have a distorted image. If you have cropping set to true wordpress uses hard cropping method which means it can cut off parts from any where in the thumbnail image top, left, right or bottom to maintain the aspect ratio of the image and keep it under the defined size that we specified.
Mark Jaquith is a Lead WordPress Developer: He explains How the wordpress resizing and cropping works much better and more:
You have two options here: box-resizing and hard-cropping. Box resizing shrinks an image proportionally (that is, without distorting it), until it fits inside the “box” you’ve specified with your width and height parameters. For example, a 100×50 image in a 50×50 box would be resized to 50×25. The benefit here is that the entire image shows. The downside is that the image produced isn’t always the same size. Sometimes it will be width-limited, and sometimes it will be height-limited. If you’d like to limit images to a certain width, but don’t care how tall they are, you can specify your width and then specify a height of 9999 or something ridiculously large that will never be hit.
Your second option is hard-cropping. In this mode, the image is cropped to match the target aspect ratio, and is then shrunk to fit in the specified dimensions exactly. The benefit is that you get what you ask for. If you ask for a 50×50 thumbnail, you get a 50×50 thumbnail. The downside is that your image will be cropped (either from the sides, or from the top and bottom) to fit the target aspect ratio, and that part of the image won’t show up in the thumbnail.
Setting up even more Post Thumbnails TOP ↑
Not satisfied with just one thumbnail? We can generate even more thumbnails! How, you ask? simple. We can use the add_image_size() function, it has the same exact functionality as the set_post_thumbnail_size() function with one added benefit you can name your thumbnails however you want (instead of the default post-thumbnail name). Therefore allows us to make multiple thumbnails each with its own unique names and sizes.
if( function_exists( 'add_theme_support' ) ) { // This theme uses post thumbnails add_theme_support( 'post-thumbnails' ); // Generate a new thumbnail with our desired name and size add_image_size( 'special-thumb', 250, 250, true ); // Generate a new thumbnail with our desired name and size add_image_size( 'small-thumb', 50, 50, true ); // Generate a new thumbnail with our desired name and size add_image_size( 'large-thumb', 400, 400, true ); }
The set_post_thumbnail_size() function inherits its functionality from the add_image_size() function, so almost everything remains the same for both – Read this post to learn the difference.
Displaying your Post Thumbnails TOP ↑
This will be very easy, you just need one small line of code like the one below.
<?php the_post_thumbnail(); ?>
You just need that line of code to display the newly generated thumbnail. By default it will fetch that new thumbnail that we generated above which was assigned the post-thumbnail name/keyword.
WordPress will first search for the default auto generated thumbnail then it moves onto post-thumbnail that we generate above using the set_post_thumbnail_size() function.
NOTE: For each post thumbnail you show in your page 3 more database queries are added, so for instance if you had a page with 10 post there would be 30 more database queries to run.
There are also optional parameters we can pass to this function, the first parameter accepts a name/keyword of the image we are trying to show or an array value of width and height – WordPress by default generates a few images and thumbnails when we upload a new image for our post.
<?php the_post_thumbnail( 'thumbnail' ); // Default 150x150px ?> <?php the_post_thumbnail( 'medium' ); // Default 300x300px ?> <?php the_post_thumbnail( 'large' ); // Default 1024x1024px ?> <?php the_post_thumbnail( 'full' ); // The original copy ?>
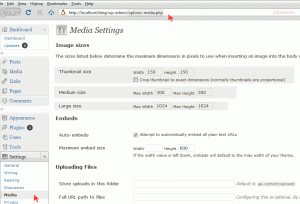
There are total of 4 images generated when you upload a new image using the media uploader, though there might be cases when some of them may not be available, like the Large version will only be generated if your original image has a size greater than the one defined for the Large version in your WP-Admin-> Settings-> Media page (see below pic).
Note: To be able to use the above named sizes with the the_post_thumbnail() function you first have to make sure a default thumbnail is set by using the Set Featured Image link in your Post Add / Edit Interface, if you don’t have a post thumbnail set there it wont detect the above either, not sure why this is required, But it is.
You can change the default values for the pre-made image versions in the WP-Admin-> Settings-> Media page in your WordPress Admin, See the below photo for a better look of where you can do that.
// Here we are using an array value of width and height to specify // the size of the image we want. the_post_thumbnail( array(100,100) );
By specifying an array value of width and height as the values, instead of the name of the images. The function then fetches the closest version of the image from the ones it has generated automatically, after doing that it does the resizing accordingly. So by specifying 200×200 for the width and height value above, wordpress will be fetching our named image medium which it generates at the time of uploading the image, also the medium image is generated with a size of 300×300 according to our default setting in the wp-admin-> setting-> media, so its pretty close to the one we specified above. To be even more clear, specifying the value like above is the same as using the names/keywords of the image. We can also assign css classes, useful for styling the thumbnail with css or change the value of the img alt attribute.
// Assigns 2 CSS classes to our post thumbnail. the_post_thumbnail( array(100,100), array("class" => "class1 class2") );
// Assigns alignleft CSS class to align it, also edits the value of the img tag 'alt' attribute. the_post_thumbnail('thumbnail', array('class' => 'alignleft', 'alt' => 'Image Description'));
Bullet-Proof your Post Thumbnails TOP ↑
One last thing i would like to point is that you should be using the the_post_thumbnail() function with a if/else wrapper too, it can prove to be very useful and at the same time gives you backward compatibility.
// Wrap it if ( function_exists("has_post_thumbnail") && has_post_thumbnail() ) { the_post_thumbnail(); } else { // If there is no thumbnail for this post, show a default one. echo '<img src="'.get_bloginfo("template_url").'/images/default-post-thumbnail.gif" />'; }
This code would be placed where you want to display your post thumbnails, most likely in your loop. It checks if the post has any post thumbnails, if it does it displays it using the_post_thumbnail() function, otherwise we can now tell it to show a default thumbnail in-case no thumbnails are found for a certain post.
Thank you for reading TOP ↑
I would really love to hear your feedback and suggestions about this post, and i would also appreciate if you could let me know how i can improve this post, so that it is more easier and clearer for others. But if that is too much to ask a Thank You! would be just as appreciated. You can find more useful information using the below resources list that i found very helpful.
Useful Resources TOP ↑
- Mark Jaquith: New in WordPress 2.9: Post Thumbnail Images
- WPengineer: The Ultimative Guide For the_post_thumbnail In WordPress 2.9
- WP Codex: the_post_thumbnail() Function Reference
- WP Codex: add_image_size() Function Reference


Leave a Reply